
(a)
The phases present and the weight fraction of each phase after the procedure.
(a)
Answer to Problem 5.17P
The phases present is
Explanation of Solution
Draw the phase diagram for Iron carbon alloy as shown below:
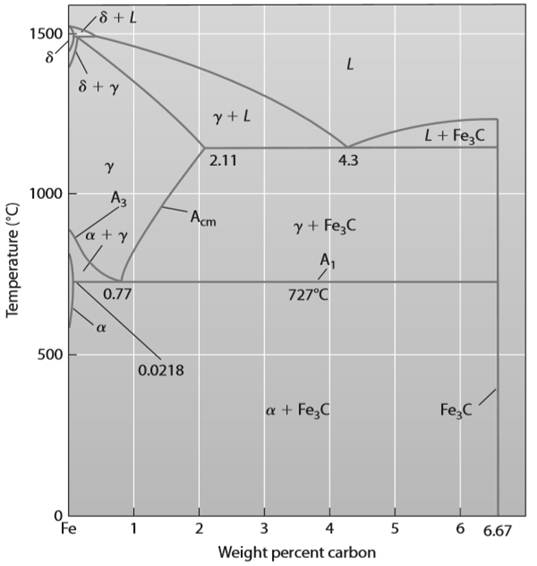
Refer to Above figure; when
At
Write the expression for weight fraction of
Here,
Write the expression weight fraction for
Here,
Calculation:
Substitute
Substitute
Thus, the phases present is
(b)
The approximate weight fraction of alloy in proeutectoid
(b)
Answer to Problem 5.17P
The approximate weight fraction of alloy in proeutectoid
Explanation of Solution
Refer to the phase diagram of iron-carbon alloy the chemical composition of
Write the expression for weight fraction of
Here,
Write the expression weight fraction for Pearlite phase by lever rule.
Here,
Calculation:
Substitute
Substitute
Thus, the approximate weight fraction of alloy in proeutectoid
Want to see more full solutions like this?
Chapter 5 Solutions
Materials Science And Engineering Properties
- Describe the basic properties of Halloysite.arrow_forward29) Copper and nickel have an isomorphous phase diagram. Label which curve best matches the GENERAL TREND expected for the following properties (fill in the blank): Ductility (elongation): Yield Strength: Electrical resistivity: Note: you can use the same line for multiple properties if you choose. Modulus, Strength, Resistivity 3 A B C wt% Ni Niarrow_forwardView Policies Current Attempt in Progress Using the Animated Figure 10.40, the isothermal transformation diagram for a 0.45 wt% C steel alloy, specify the nature of the final microstructure (in terms of the microconstituents present) of a small specimen that has been subjected to the following temperature treatments. In each case assume that the specimen begins at 845 °C and that it has been held at this temperature long enough to have achieved a complete and homogeneous austenitic structure. a) Rapidly cool to 700 degrees C, hold for 100,000 s, then quench to room temperature. b) Rapidly cool to 450 degrees C, hold for 10 s, then quench to room temperature. proeutectoid ferrite + pearlite proeutectoid ferrite + martensite proeutectoid ferrite + pearlite + martensite eT proeutectoid ferrite + pearlite + bainite + martensite all spheroidite Save all bainite Attempts: 0 of 5 used Submit Answer all martensite bainite + martensitearrow_forward
- Using the isothermal transformation diagram for a 0.45 wt% C steel alloy (Figure 10.40), determine the final microstructure (in terms of just the microconstituents present) AND approximate percentages of the microconstituents that form in a small specimen that has been subjected to the following time-temperature treatments. In each case assume that the specimen begins at 845°C (1550°F), and that it has been held at this temperature long enough to have achieved a complete and homogeneous austenitic structure. (a) Rapidly cool to 250°C (480°F), hold for 10^3 s, then quench to room temperature. (b) Rapidly cool to 700°C (1290°F), hold for 30 s, then quench to room temperature. (c) Rapidly cool to 700°C (1290°F), hold at this temperature for 10^5 s, then quench to room temperature. (d) Rapidly cool to 400°C (750°F), hold for 500 s, then quench to room temperature.arrow_forwardAt a temperature of 60°F, a 0.02-in. gap exists between the ends of the two bars shown. Bar (1) is an aluminum alloy [E = 10,000 ksi; v = 0.32; α=α=12.5 x 10⁻⁶/°F] bar with a width of 2.8 in. and a thickness of 0.85 in. Bar (2) is a stainless steel [E = 28,000 ksi; v = 0.12; α=α=9.6 x 10⁻⁶/°F] bar with a width of 1.6 in. and a thickness of 0.85 in. The supports at A and C are rigid. Assume h1=2.8 in., h2=1.6 in., L1=26 in., L2=40 in., and Δ=Δ= 0.02 in. Determine(a) the lowest temperature at which the two bars contact each other.(b) the normal stress in the two bars at a temperature of 225°F.(c) the normal strain in the two bars at 225°F.(d) the change in width of the aluminum bar at a temperature of 225°F.arrow_forwardAnother of the steel components manufactured by michael's company is steel railway track sections. Thecomponent has a length of 120m (at a temperature of -10°C) and is to be exposed to a temperaturerange of -10°C to 55°C. In order to calculate the gaps which need to be left between the sections michael'scustomer needs to determine the maximum length which each railway track section will expand to andmichael have been asked to carry out the calculation for them. michael have also been instructed to determinethe percentage change in volume and surface area when exposed to the same initial and finaltemperatures. The customer has informed him that the cross sectional profile of the railway track isrectangular and of breadth 14cm and height 32cm. Assume the coefficient of thermal expansion ofsteel is 12x10-6 /°C. Briefly discuss the changes that occur with in the steel as a result of the change intemperature.arrow_forward
- At a temperature of 60°F, a 0.04-in. gap exists between the ends of the two bars shown. Bar (1) is an aluminum alloy [E = 10,000 ksi; v = 0.32; α=α=12.5 x 10⁻⁶/°F] bar with a width of 2.5 in. and a thickness of 0.75 in. Bar (2) is a stainless steel [E = 28,000 ksi; v = 0.12; α=α=9.6 x 10⁻⁶/°F] bar with a width of 1.7 in. and a thickness of 0.75 in. The supports at A and C are rigid. Assume h1=2.5 in., h2=1.7 in., L1=31 in., L2=46 in., and Δ=Δ= 0.04 in. (A) Determine the lowest temperature, Tcontact, at which the two bars contact each other. (B) Find a geometry-of-deformation relationship for the case in which the gap is closed. Express this relationship by entering the sum δ1+δ2, where δ1 is the axial deflection of Bar (1), and δ2 is the axial deflection of Bar (2). δ1+δ2= _____in. (C) Find the force in the Bar (1), F1, and the force in Bar (2), F2, at a temperature of 225oF. By convention, a tension force is positive and a compression force is negative. IN KIPS (D) Find σ1 and σ2,…arrow_forwardThe assembly consists of a brass shell (1) fully bonded to a ceramic core (2). The brass shell [E = 86 GPa, α= 18 × 10−6/°C] has an outside diameter of 33 mm and an inside diameter of 27 mm. The ceramic core [E = 320 GPa, α= 2.5 × 10⁻⁶/°C] has a diameter of 27 mm. At a temperature of 15°C, the assembly is unstressed. Assume L = 320 mm. Determine the largest temperature increase Δt that is acceptable for the assembly if the normal stress in the longitudinal direction of the brass shell must not exceed 65 MPa.arrow_forwardWhich of the following alloys would form a complete substitutional solid solution? Metal 1 is BCC, metal 2 is FCC, and atomic radíus difference is 12%. Metal 1 is FCC, metal 2 is FCC, and atomic radius difference is 12%. Metal 1 is FCC, metal 2 is FCC, and atomic radíus difference is 15%. Metal 1 is HCP, metal 2 is FCC, and atomic radius differene is less than 15%. Metal 1 is BCC, metal 2 is BCC, and atomic radius difference is at least 15%.arrow_forward
- 16) Which of the following mechanical properties can be measured / calculated from this tensile stress-strain graph of a generic metal alloy? (pick all that apply) a. Poisson's ratio b. Elastic modulus C. Shear modulus d. Flexural modulus e. Fracture toughness 17) Interstitial sites in a FCC lattice are called a. Rhombohedral and cubic b. Cubic and hexagonal C. Monoclinic and triclinic Stress (MPa) 2000 MPa 2000 1000 1000 0.000 0.005 0.010 0.015 Strain 0.000 0.020 0.040 Strain 0.060 0.080 d. Tetrahedral and octahedral e. Heterogeneous and homogeneous 18) Traditional photovoltaics rely on which structural feature to separate charge carriers? a. The p-n junction b. The grain boundaries C. The twin boundaries d. The electron-hole pair e. The band gap 19) The process by which lithium ions move in to and out of graphite in a lithium-ion battery is called a. Intercalation b. Stacking C. Precipitation d. Phase combination e. lonization 20) A polymer obtained by the polymerization of two types…arrow_forwardA copper rod is deformed using a uniaxial tensile force of 16000 N. Deformation continues until sufficient strain hardening has occurred such that the applied force is too small to allow further deformation. After deformation, the rod has a diameter of 0.01 m and a length of 1.5 m. Assume that copper follows the strain hardening lawwith K of 310 MPa and n=0.54 Please calculate the true strain after the deformation ?arrow_forwardAt a temperature of 60°F, a 0.04-in. gap exists between the ends of the two bars shown. Bar (1) is an aluminum alloy [E = 10,000 ksi; v = 0.32; a = 12.5 x 10⁻⁶/°F] bar with a width of 3.0 in. and a thickness of 0.75 in. Bar (2) is a stainless steel [E = 28,000 ksi; v = 0.12; a = 9.6 x 10⁻⁶/°F] bar with a width of 2.0 in. and a thickness of 0.75 in. The supports at A and C are rigid. Determine (a) the lowest temperature at which the two bars contact each other. (b) the normal stress in the two bars at a temperature of 250°F. (c) the normal strain in the two bars at 250°F. (d) the change in width of the aluminum bar at a temperature of 250°F. (1) 3.0 in. 32 in. 2.0 in. B ↓ (2) 44 in. 0.04-in. gap Determine the lowest temperature, Tcontact, at which the two bars contact each other.arrow_forward
- Materials Science And Engineering PropertiesCivil EngineeringISBN:9781111988609Author:Charles GilmorePublisher:Cengage Learning