63.8 03 D7 NOTE I of 3:009 NOTE I Ø32 M40 x 1.5 NOTEI ® 32 H8 26.2 $ 14 L O 18.6 $ 65 69.6 + Ø32 8.5 40 1,5 N6 ± Ø32 UNLESS OTHERWISE SPECIFIED DIMENSIONS ARE IN MILLETERS SURFACE ROUGHNESS DIMENSIONS AND TOL APPLY BEFORE FINISH DIAMETER/ LINEAR DIMENSIONS > 0,5 ANCULAR ISHORTER SIDE LENGTIO HOLE > 30 > 120 > 315 > 10 > 1 000 < 1 000s 2 000 DMENSIONS MAXIMUM INTERNAL RADIUS 02 RADIVOIAMFER > 0.5 > 30 > 120 > 50 > 20 BREAK SHARP EDGES 0.3 x 45 MAXIMUM DIAMETER ( 30 1.6/ VRo MAX ( 35 5 30 < 50 ( 20 ( 400 ALL DIAMETERS ON SAME AXIS CONCENTRIC WITHIN 0.2 TIR S 20 TOLERANCE- H3 TOLERANCE 0.2 10.5 : 0.0 + L2 TOLERANCE :02 TOLERANCE :0.5° •0.3° :0.2° TOLERANCE GRADE 0,5 12 LIMIT NOTES: 1. NICKEL PLATE 0.005-0.01 M40 X 1.5 THREADS,AND Ø3D7 HOLES TO BE FREE OF FINISH Ø3D7 0.02 Ø1.5N6 -0.ờoT 0.039 Ø32H8 70.02 A 450 73.6 36.8 6.5 1.3 28.3 ± Ø32 3 X 05 O0.5C Ix45° O6 X 5.4 0.02|B I1.5 15.6 3.2 Ø32 30 0.1 48.5 O 100 60 0.2 2±2" 2 2 R0.3 01 R 0.25 RO.3 0J R 0.25 2.2 2.2 COMPUTER GENERATED DRA WING PERKIN ELMER DO NOT SCALE DRAWING MATERIAL NORWALK, COMNECTICUT DRAWN C. W. SMITH CHECKED VDH TOAYE /5/30 DATE THIS DRAWING AND SPECIFICA- TION IS THE PROPERTY OF THE PERKIN ELMER CORPORATION, IT 5-26 IS ISSUED IN STRICT CONFIDENCE, AND SHALL NOT BE REPRODUCED. OR COPIED, OR USED AS THE BASIS FOR THE MANUFACTURE OR SALE OF APPARATUS WITHOUT PRIOR WRITTEN PERMISSION, CHAMBER-BAKER BRASS FM 360 ECN 55666 N538-0022 N538-0021 N538-0020 OATE LOWER PROJENCH KMCK APPROVED IACHARD SCALE DR 22847 THIRD ANGLE DATE 4-19 FINISH DN538-1000B METHODS NOTEI CHG DESCRIPTION DA TE OTY USED ON CHG 10 1. AP-006. Print supplied by Perkin Elmer.
I need these two parts answered (Multiple Choice). If you can not answer all two parts please leave it for another tutor to answer. Thank you.
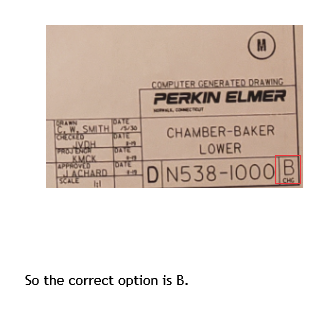
What size paper was used for the original version of this print? (Multiple Choice)
A
B
C
D
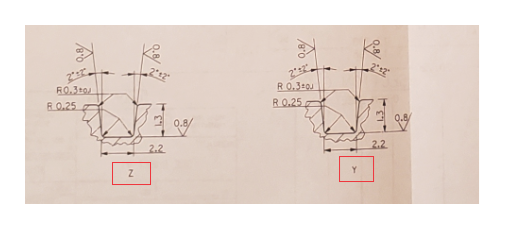
The two views near the bottom of the print are called detail views. Which one of theviews above (left side, front, or right side) shows the same geometry, but at the normal 1:1scale? (Multiple Choice)
a. left side
b. front
c. right side
The major diameter (100 mm) of this part is interrupted by a flat surface on top. Is an auxiliary view required to show the true size and shape of that flat surface? (Multiple Choice)
a. Yes
b. No

It is shown in the drawing that the size paper used for the original version of this print is B.

Detail drawings are used if it is impossible to give detail of that portion, if the size of that part is too small. So, details drawing are used to give full details of smaller portion.
Two views are shown at the bottom of the drawing named as Y and Z respectively, which is detail drawing.

Step by step
Solved in 4 steps with 3 images


